It can make all the difference to create a room that is both fashionable and incredibly functional, particularly when building a custom closet.
A custom built wardrobe is the ideal way to bring order to the daily chaos, regardless of whether you’re starting from scratch or looking to improve your current storage situation.
This comprehensive guide will show you the fundamentals of building your own closet like an expert, from optimizing every inch to creating that seamless, built in closet systems look.
Step 1: Identify How Much Storage You Need
Think carefully about what your closet will need to support before you start designing. Are you setting up a large walk-in closet, a typical reach-in closet, or even a functional space out of an unused corner? Make a thorough inventory of all the clothes, accessories, and shoes you own.
If you want to design your own closet in a way that really suits your particular lifestyle, this first step is absolutely essential.
Step 2: Measure the Space Accurately
When you’re creating custom built wardrobes, precision is your best friend. Carefully measure the height, width, and depth of your designated space. Don’t forget to account for those often-overlooked details like baseboards, vents, or any sloping ceilings. A solid blueprint right from the start ensures that your closet shelving systems and built-in components will fit together perfectly.
Nowadays, many homeowners use custom closet design online tools to get a visual of their plans before they even think about buying materials.
Step 3: Sketch a Layout and Plan Your Storage Zones
Now that you’ve got all your measurements down, it’s time to sketch out a layout. Divide the closet space into different storage zones: dedicated hanging areas (for both long and short garments), drawers for folded items, open shelves for easy access, and smaller cubbies for accessories.
When you’re planning, seriously consider incorporating closet shelving systems that offer adjustable features – this gives you so much more flexibility down the line. This phase of planning is where you really start to build your own wardrobe concept from the ground up.
Step 4: Choose Materials and Components
Selecting high-quality materials is key to ensuring your custom closet will stand the test of time and daily use. Plywood, MDF (Medium-Density Fiberboard), or melamine boards are all popular choices for those who love a good DIY project. When it comes to the inner workings, you can choose from modular built in closet systems that offer pre-designed components, or go completely custom with unique drawers, specialized racks, and stylish hardware.
Make sure you choose finishes that not only match the overall aesthetic of your home but also keep long-term functionality front and center as you build your own wardrobe.
Step 5: Install the Frame and Shelving
With your design all finalized and your materials ready to go, it’s time to get building! Start by constructing the main frame and any essential support structures. Make sure you use appropriate wall anchors to guarantee everything is stable and secure. Then, carefully install your chosen closet shelving systems, hanging rods at the correct heights, and drawer units according to your planned layout.
For those who are just starting out with DIY, pre-made kits can make it significantly easier to build your own closet without needing advanced carpentry skills or specialized tools.
Step 6: Add Finishing Touches
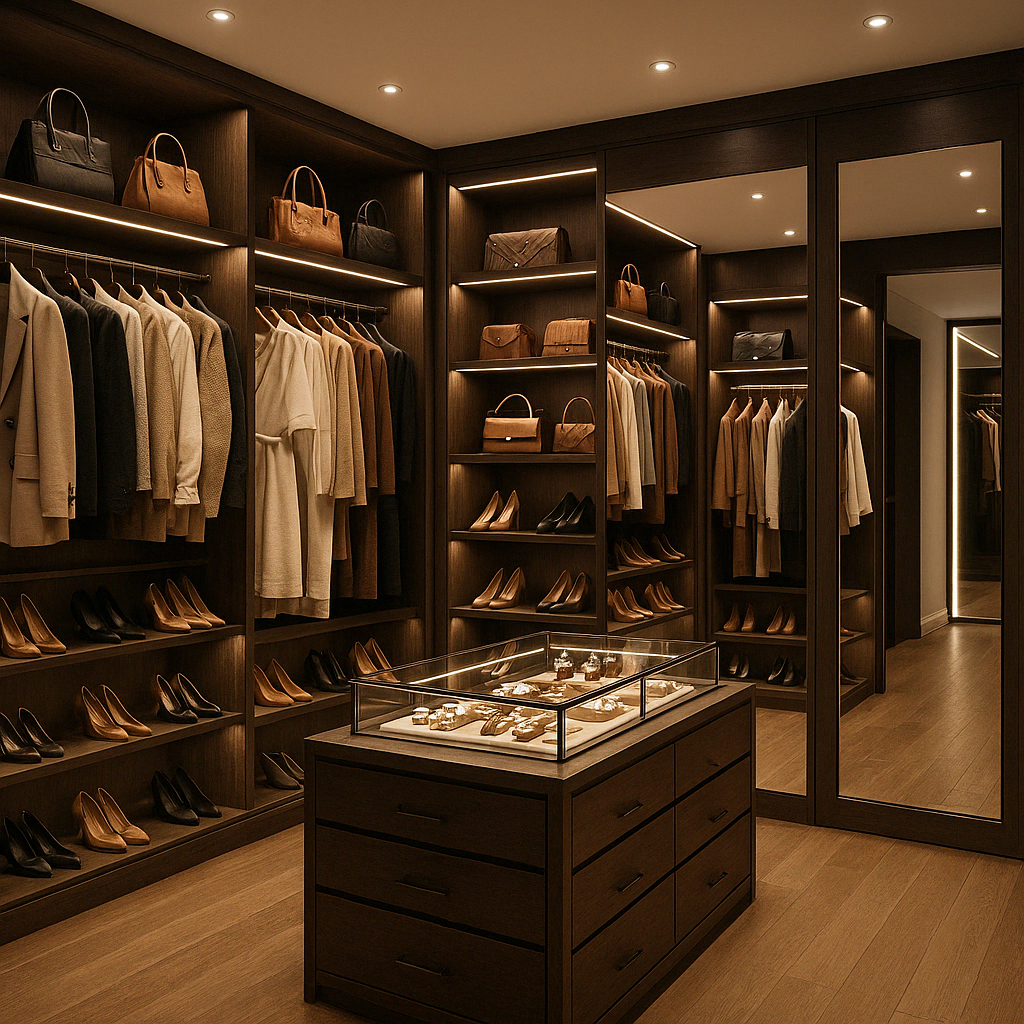
The little details can really elevate the look and feel of your new space. Add baseboards, trim pieces to conceal any gaps, and choose custom hardware that reflects your personal style to give your custom built wardrobe a truly polished and professional look. Don’t forget to consider lighting solutions like sleek LED strips or convenient sensor lights to brighten up the interior of your closet.
Thoughtful additions like labeling systems, drawer and shelf organizers, or even a full-length mirror can significantly enhance both the functionality and the luxurious feel of your newly built in closet systems.
Step 7: Organize and Personalize
Finally, it’s time to bring your closet to life by thoughtfully arranging all your clothes and accessories within your newly created space. Utilize baskets, drawer dividers, and shelf inserts to maintain order and maximize the usability of your closet shelving systems.
This is your moment to truly personalize your custom closet design online vision, transforming it into a tangible and highly functional part of your home.
Conclusion
Ultimately, building a custom closet is much more than just a weekend project – it represents a smart and lasting investment in both your home and your daily routine. Whether you decide to use professional-grade tools or opt for user-friendly DIY kits, the key to success lies in careful planning and precise execution.
From streamlined built in closet systems that offer efficient storage to fully bespoke custom built wardrobes that cater to your every need, the possibilities are truly endless when you take the time to thoughtfully design your own closet and ultimately build your own wardrobe.
With the right approach and a little effort, you can transform any underutilized space into a beautifully organized and highly functional haven that is perfectly tailored to meet your specific needs.